
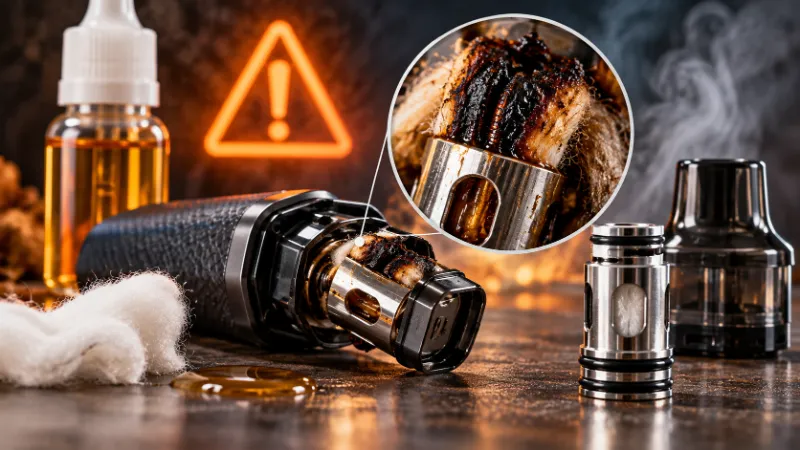
MY vape tastes burnt, Why?
An Engineering Analysis: Why Does an Atomiser Coil Produce an Acrid Burnt Taste?
Hello. If you have arrived here in a hurry, it is almost certainly because you have just drawn air through an electronic atomiser and received in return a sensation reminiscent of someone setting fire to a 1974 Austin Allegro door card inside your throat. It is thoroughly unpleasant, distinctly alarming, and entirely the result of an elementary breakdown in thermal equilibrium.
You see, despite their glossy exteriors and bright LED displays, modern vaping instruments are not mystical smoke wands. They are remarkably straightforward micro-boilers governed by the unyielding laws of thermodynamics, capillary action, and electrical resistance. When one tastes burnt material, it is simply because the heat source has outrun its coolant. Allow me to explain precisely what has gone mechanically awry inside your tank, and how we might neatly prevent it from ever happening again.
The Thermodynamic Equation Inside the Atomiser
To understand the burnt taste, we must look closely at the mechanical assembly housed within components such as the Innokin Prism T18E Coils or an Oxva Xlim Pro Pods TOP FILL cartridge. The core assembly consists of two principal parts: an electrical resistor (typically a stamped Kanthal or Nichrome mesh matrix) and a wicking substrate made from compressed, unbleached organic Japanese cotton.
In standard operation, electrical current from the battery cell heats the resistive mesh to approximately 180°C to 220°C. The liquid absorbed within the adjacent cotton acts simultaneously as a vaporisation source and an evaporative cooling agent. As long as the cotton remains fully saturated, the latent heat of vaporisation ensures that the surface temperature of the cotton fibres never exceeds the chemical breakdown threshold of cellulose. However, if the cotton becomes starved of liquid, that evaporative cooling ceases entirely. The metal mesh surges past 260°C within fractions of a second, causing the dry cellulose fibres to undergo rapid pyrolytic combustion. Put plainly: you have ignited the wick.
| Component State | Wick Saturation Level | Mesh Operating Temp | Resulting Inhalation Experience |
|---|---|---|---|
| Nominal Equilibrium | 100% Saturated (Capillary Primed) | 180°C – 210°C | Clean, atomised flavour and smooth vapour |
| Partial Starvation | 30% – 50% (Delayed Capillary Draw) | 220°C – 245°C | Dry, papery drag; muted aroma; warning sign |
| Total Wick Combustion | Under 10% (Bone Dry Cotton) | 260°C – 320°C+ | Pyrolysis of cellulose; harsh carbon hit |
The Mechanical Points of Failure
1. Capillary Starvation via Inadequate Priming
The single most prevalent procedural error among British vapers is the premature firing of a factory-fresh atomiser. The unbleached organic cotton used in modern pods—such as those found on the Voopoo Argus G2 Mini or the Geekvape Sonder Q Pod Vape Kit—is compressed very tightly to maximise volume within a tiny chassis. The pores of this cotton are microscopic. When you inject fluid through the fill port, surface tension initially prevents the liquid from instantly reaching the innermost layer of cotton in contact with the mesh.
If current is applied while that core remains dry, the internal fibres char immediately. Once charred, the cotton loses its porosity, meaning it can never properly absorb fluid again. One must practice British patience: fill the cartridge, place it upright upon a level surface, and wait precisely eight to ten minutes. That allows capillary pressure to overcome internal surface resistance, fully soaking the core.
2. Fluid Viscosity Mismatch (Poiseuille’s Law in Miniature)
E-liquid is fundamentally an emulsion of Propylene Glycol and Vegetable Glycerine. The dynamic viscosity of high-VG mixtures (such as 70% VG formulations) is considerably greater than that of a standard 50/50 salt nicotine liquid. In a high-powered tank like the Aspire Zelos 3 Kit with a wide-aperture coil, large wicking ports permit dense liquid to pass freely.
However, when dense VG is introduced to a miniature, high-resistance pod device—for instance, an Innokin Endura T18-II Kit—the viscous liquid simply cannot pass through the tiny 1.5mm fluid inlet holes at the rate demanded by the heating element. You take a puff, clear the immediate liquid, and because the replacement liquid takes thirty seconds to crawl through the narrow aperture, your subsequent inhalation cooks dry cotton. For all compact pod hardware, one must strictly employ balanced 50/50 liquids such as Vampire Vape 10ml or SKE Crystal Salts.
3. Hydrostatic Pressure Failure (The Empty Tank Trap)
Inside a sealed refillable pod, liquid does not enter the wick purely by absorption; it is assisted by hydrostatic head pressure exerted by the volume of fluid residing above the intake ports. When you allow your reservoir to drop until it is practically empty, two things happen: first, the physical intake ports become exposed to ambient air inside the pod, breaking the vacuum seal; second, surface tension pulls air bubbles directly against the mesh.
As soon as you incline the device to draw, the atomiser chamber fills with air instead of juice. To prevent this, observe the "Minimum" indicator line stamped into your plastic pod, or top up the reservoir whenever the fluid level drops below the upper edge of the visible cotton wicking ports.
Workshop Priming Time & Viscosity Calculator
Determine the mathematically ideal saturation rest time based on coil resistance and base fluid ratio.
The Methodical Workshop Remediation Routine
Should you find yourself currently holding an atomiser that produces an intolerable roasted flavour, follow this logical, orderly sequence to rectify the apparatus:
- Cease electrical discharge: Do not persist in drawing upon the mouthpiece. Once carbon deposits form, continuing to heat the element simply bakes those particulates into the chimney housing.
- Disassemble and discard the spent module: If you are employing integrated pod cartridges—such as the Vaporesso XROS Corex 3.0 Pods or Joyetech EVIO M Pro Replacement Pods—the charred wick cannot be repaired or laundered. Deposit the cartridge responsibly in electrical waste.
- Inspect and sanitise electrical contacts: Using a dry microfibre swab, inspect the recessed compartment of your battery unit. Wipe away any stray droplets of e-liquid or condensation from the spring-loaded brass pogo pins. A clean mechanical contact ensures steady, regulated voltage delivery.
- Perform cold priming on the new unit: Install your replacement pod, fill with compliant UK-certified e-liquid, and allow the aforementioned capillary period to elapse. Before connecting the pod to the powered base, draw gently through the tip twice to generate negative internal pressure and draw fluid firmly into the core.
Engineering rewards patience and mechanical empathy. If you feed an atomiser the correct viscosity of liquid, allow sufficient time for capillary absorption, and maintain a watchful eye on your reservoir levels, your coils will function cleanly, efficiently, and smoothly for hundreds of pleasurable cycles.